Make your own Astrolabe
4. The Front of the Mother
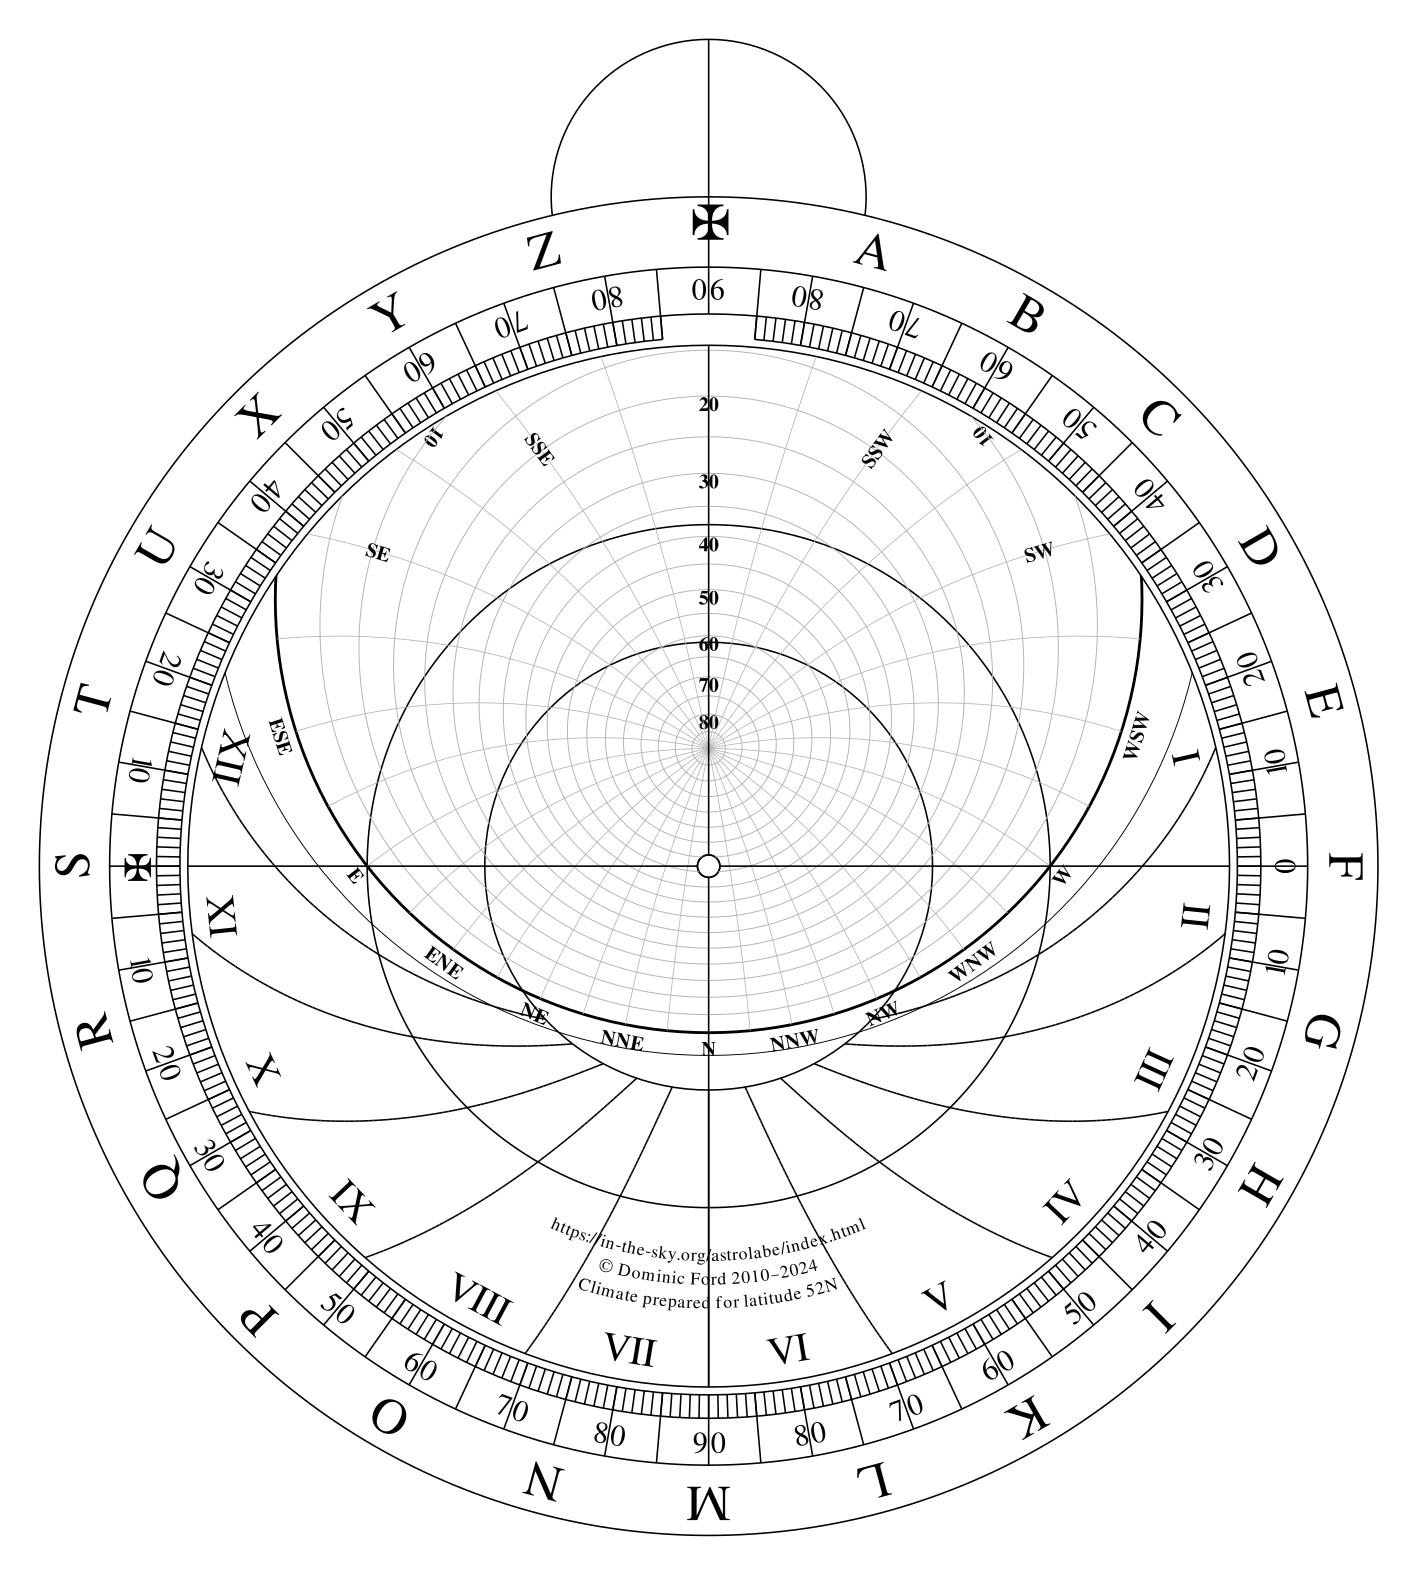
The front side of the mother of the model astrolabe. Click to enlarge.
The image to the right shows the front of the mother of the astrolabe.
Around the edge, twenty-four symbols are inscribed, beginning with a cross and then proceeding through the Roman alphabet. These represent the twenty-four hours of the day, with the cross representing noon and the letter 'M' midnight.
Historically, these characters and the scale of degrees next to them would have appeared on a raised rim around the edge of the mother, encircling a large well in the middle, which Chaucer calls the "womb" of the astrolabe.
Everything inside this outer rim forms part of the climate, which is customised to work only at one latitude on Earth. Traditionally, this would take the form of a separate sheet of wood or brass which slotted into the womb. A tab at the top ensures that the climate is correctly aligned with the mother.
A deluxe model of astrolabe might come with several climates designed for different latitudes, enabling travellers to adjust their astrolabes to work in different locations, in much the same way that a modern traveller might change their watch to a new timezone. Often, the womb was deep enough that all of the climates could be stacked within for convenient storage.
As we shall see in due course, the climate is used in a similar way to a modern planisphere to provide a map of the objects visible in the sky at any given time.
The rete
The rete shows a planispheric projection of the brightest stars in the northern sky. It is slotted over the top of the climate, and allowed to rotate freely around the centre to model the rotation of the sky through the night.
In the design presented here, the rete takes the form of a transparent plastic sheet, allowing you to simultaneously see the stars printed onto it, and the lines marked onto the climate which sits behind it.
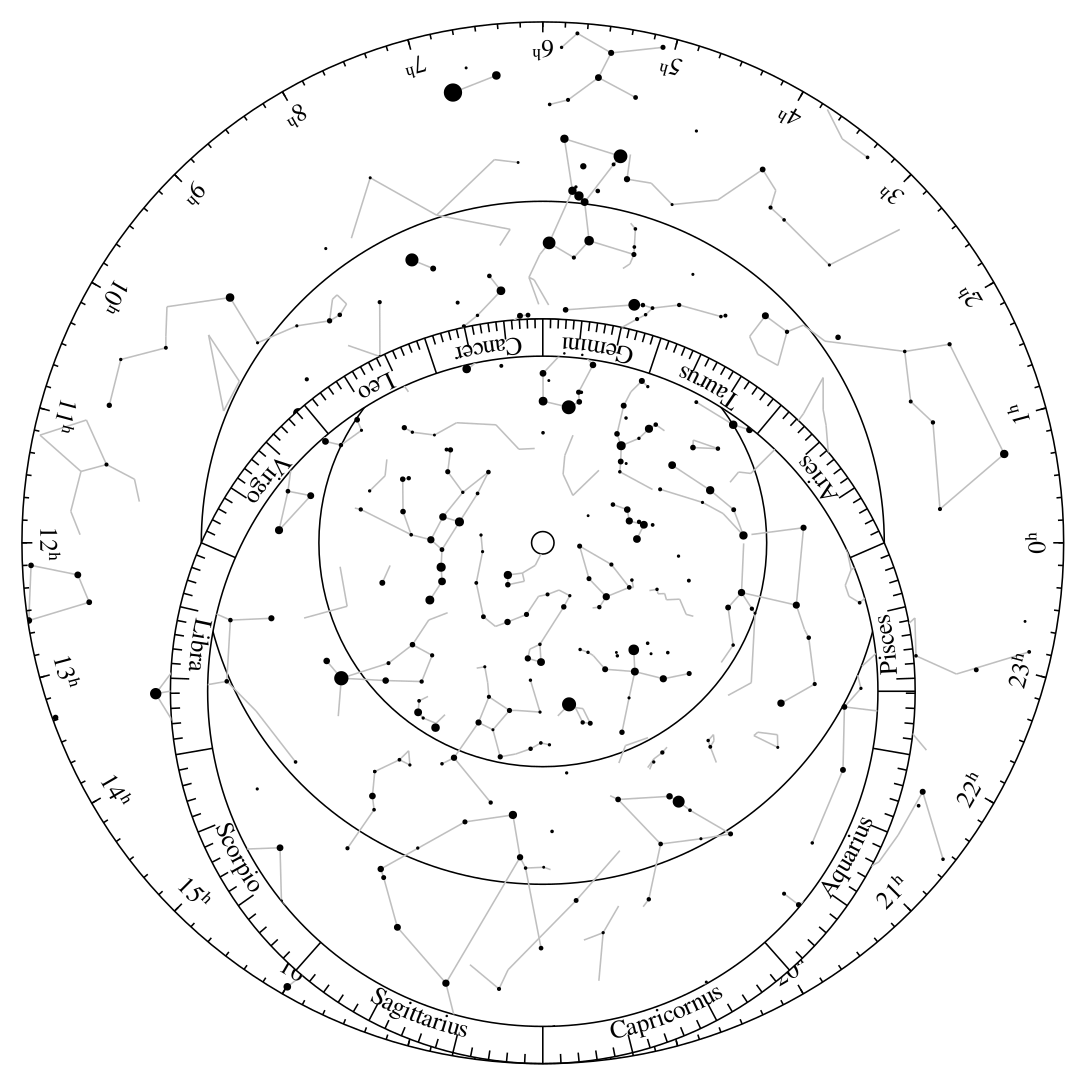
The rete of the model astrolabe
In medieval times, however, such luxuries as transparent plastic were not available. Consequently, the retes of medieval astrolabes were made from intricately carved brasswork, with brass arrows pointing to the locations of bright stars. As much of the metal between the bright stars as possible would be removed to show the climate underneath. In consequence, it was never possible to show more than a few of the most prominent stars.
Since the purpose here is not to reproduce a particular historical astrolabe, but rather to provide a working specimen that might be used by astronomers today, this is the one component of the instrument where I have taken the liberty of substantial modernisation.
A mathematical aside: I used the Yale Bright Star Catalogue to create the rete for this model, marking all stars brighter than fourth magnitude. The projection used is the same as is used on modern planispheres: if a star has right ascension α and declination δ, then it is plotted at a distance proportional to tan((90°- δ )/2) from the centre and at azimuth α.
The north pole appears at the centre. Three concentric circles drawn around this represent the Tropic of Cancer, the equator, and the Tropic of Capricorn. The last of these is chosen as the outer edge of the astrolabe; hence stars southwards of declination 23.5°S are not shown.
It is not possible to continue the projection all the way to the southern celestial pole, which would appear at infinite distance from the centre, and so some declination cut-off has to be chosen.
Around the edge of the rete, I have marked a scale of right ascension. This is a modernisation that would not have been present on historical instruments, but is provided as a navigational aid for the modern astronomer.
As on the back of the astrolabe, a pointer is also placed over the top of the rete and allowed to pivot around the centre of the astrolabe like the hands of a clock. The pointer on this side is called the rule (alternately, it is sometimes called the label by Chaucer), and a scale marked along it shows the declination of stars at any given distance from the centre of the astrolabe.
Why is the sky back-to-front?
If you are already familiar with the constellations, you may notice the surprising fact that the rete depicts all of the constellations back-to-front. Objects that appear to the left of Orion in the sky, appear to the right of it on the rete. Why did I make such a mistake?
This is not, in fact, a simple act of carelessness on my part, but a historically authentic reproduction of the retes on the vast majority of medieval astrolabes, including the one described by Chaucer.
We don't know for sure why astrolabes were built this way. My hunch is that this may tell us something about the uses to which astrolabes were put in medieval times.
Were astrolabes used by keen observers, who wanted to learn to navigate the night sky? This is unlikely, given the small number of stars which were marked on most medieval brass astrolabes.
It is far more likely that astrolabes were used by astrologers, who wanted to know what the night sky looked like in order to cast horoscopes without having to make any observations of their own. They were also used by sailors, who would typically only sight a single object in order to estimate their latitude, and so were not interested in whether patterns of stars were reversed or not.
Finding the Sun
On the rete, the annual path of the Sun through the constellations of the zodiac is marked by a circular band. To be precise, the Sun's path is along the outer edge of this band. As previously, we use a historical definition of the constellations here: each represents an equal 30° portion of the ecliptic. The reason the northern constellations appear shrunken is simply an artifact of the projection used, which magnifies the southern sky.
To find the position of the Sun on any given day, the scale on the reverse side of the mother is used. For example, on 1st June, the scales on the reverse side tell us that the Sun has moved approximately 10° through the constellation of Gemini. Turning back to the front of the astrolabe, we see on the rete that the point 10° through Gemini is a little to the north of Aldebaran.
Using the climate
The climate is used to convert the right ascension and declination of an object into its altitude above the horizon from any given observing site. This is the part of the astrolabe that customises it to any particular geographic location.
The climate sits directly behind the rete, and shows a cobweb-like grid of lines that represent the visible portion of the sky. The criss-crossing lines are lines of constant altitude – called almucantars – and lines of constant azimuth – called azimuths – and they are used to determine the approximate alt/az coordinates of stars.
The thick line at the outermost edge of the cobweb pattern shows the horizon of the visible sky. Just as on a modern planisphere, the rotation of the sky through the night is reproduced by rotating the star chart – in this case, the rete. As the rete is rotated clockwise, stars are seen to rise in the east and set in the west.
Just beneath the horizon, a dotted line marks the path six degrees beneath the horizon. This may be used to calculate the times of civil twilight, defined to be when the Sun is between zero and six degrees below the horizon.
Lining up the astrolabe
As with a planisphere, the star chart must be brought into the correct rotation to represent a particular time and date before it can be used. On a planisphere, this is usually done by matching the desired time on a rotating scale to the desired date on a static scale marked around the edge of the planisphere.
On an astrolabe, however, no such scales are provided. Alignment is usually achieved by measuring the altitude of a reference object – either the Sun or a star – using the alidade and then rotating the rete until its projection lies on the appropriate almucantar. It is also necessary to have some sense of east and west in order to know whether to align the object so that it is rising or setting. This means that, in contrast to the planisphere, the time of day does not need to be accurately known to align an astrolabe. As we will see in the following sections, the astrolabe can even be used to determine the time from the altitude of a star.
When choosing a reference object, it is best to choose one which is well away from the meridian. When an object rises or sets, its altitude is changes rapidly with time. By contrast, when it is highest in the sky, its altitude is momentarily unchanging, and even the slightest uncertainty in its altitude leads to a large uncertainty in the time.
License
Like everything else on this website, these astrolabe kits are © Dominic Ford. However, they are provided for the benefit of amateur astronomers worldwide, and you are welcome to modify and/or redistribute any of the material on this website, under the following conditions: (1) Any item that has an associated copyright text must include that unmodified text in your redistributed version, (2) You must credit me, Dominic Ford, as the original author and copyright holder, (3) You may not derive any profit from your reproduction of material on this website, unless you are a registered charity whose express aim is the advancement of astronomical science, or you have the written permission of the author.